
Page published: 13 January 2006
 Introduction
The cabin windows are, perhaps, the most delicate item on a SeaHawk.
As with most other boats of its type they are perspex and perspex is
very easily scratched. The slightest amount of sand or grit in a cloth
will damage them and frequently polishing, or rubbing further, just
makes the situation worse.
However, careful you are eventually you will want to renew them. This page describes one owner's experience.
Perspex
Before contemplating removing your old windows make sure you have some suitable material to replace them. This boat had already had at least one set of replacement windows. This was to be a further replacement. A previous owner had replaced the original clear perspex with smoked "glass". This follows the fashion found in many more recent boats. And it has advantages! It is much more difficult to see inside the boat and can protect contents from casual theft. It also means that curtains, which many fit to their boats, may not be felt necessary.
Clear perspex is available from many local suppliers - although finding it in anything less than a full 8ft x 4ft sheet in a large DIY store can prove trickier! A local glazing specialist will often have it and be prepared to cut it to size. The original perspex was 6mm thick. However, smoked can be harder to find - and you may find yourself being quoted for a full sheet, although you only need a few square feet.
Because the windows all need bevelled edges and the side windows are curved with angled corners, if you are having the perspex cut to size professionally, it is definitely wise to make up a pattern in MDF or plywood and take this to your supplier. (If you simply take the old windows as a pattern, and these had not be cut ideally in the first place, you may find that you end up with less than ideal windows again!) In fact perspex is an easy enough material to cut with a miniture hacksaw and it can be trimmed for a better fit with a rasp, file, or Surform plane.
If buying smoked, or some shade other than clear, do make sure that it is solid colour. The prime reason that this boat's windows were being replaced was because it was undergoing a complete re-paint and the smoked colour was only in a surface film. As SeaHawk windows are slightly bowed it was beginning to break away from the body of the perspex causing unslightly lines in the window.
Removing the Old Windows
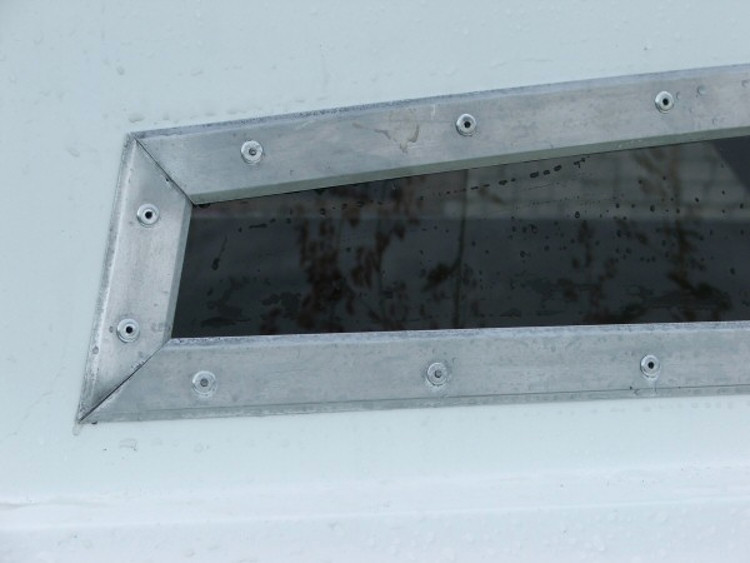
An electric drill will make short work of the rivet heads. Here all the heads have been removed and many of the old heads, looking like washers, can bee seen with other shavings on the side decks. The bodies of the two rivets in the aft edge piece have then been knocked through into the cabin, using a hammer and nail. The frame strip stays in place because of the remains of the sealant used when the window was fitted, but this can be easily prised away.

Once a frame strip is removed you can see how the old sealant was applied. You also see that the point of the lower corner of the perspex also had to be slightly trimmed as the recess in the cabin moulding does not reflect the true sharpness of the point in the window framing.
Also note that the function of the framing strips, apart from the cosmetic one of providing clean edge to the window, is to hold the perspex flush with the opening in the cabin. Sealant is only used between the perspex and the aperture in the cabin moulding. The framing has no function in sealing the window.
The discolouration in the corner of the perspex and just inside the leading edge of the window shows where the film is beginning to peel away from the perspex. This is the main reason for recommending that this form of coloured glazing material is avoided.

Once all frame strips have been lifted away you should be able to prise up a corner of the perspex and lift this away too. If it has been in place for a number of years then it will retain its curve for a while, but after a few hours will flatten to its original form.

Note that the sealant here is black, rather than the clear or white that the first time window fitter might be tempted to use. When removing it, it feels very different too. Like conventional sealants, it can easily be cut away in strips with a knife, however, it is probably best described as feeling like very soft india rubber. When rubbed it granulates in much the way that a rubber used to erase pencil marks on paper does. This makes it very easy to clean up the window aperture after removing the perspex ready for the new window as it doesn't cling as firmly as does a silicone sealant.
Fitting the New Windows
As already hinted, using the right sealant is key to making the job of fitting the new window easy. Having only got a "£100 and you must take a full sheet" quote from local glazing suppliers a specialist boat window fitter was approached.
These not only had solid coloured perspex, were prepared to supply it in the quantity needed at well under £5 per square foot, but were prepared to cut it to size "for a nominal fee". It was they too who recommended the appropriate sealant, at considerably less cost than the sealants seen in the local DIY store, too! This turned out to be labelled "Neutral Curing - Conforms to ISO 11600 - (BS 5889 Type A)".
It was they who also advised that the sealant be allowed to cure overnight, allowing the maximum amount of air to circulate round the window, before riveting the frame pieces in place. "Just secure the ends temporarily so the perspex can adopt proper curve. Then, once the sealant is cured, fix the frames with the rivets". Accordingly small peices of wood were used, bolted in place using the existing rivet holes.
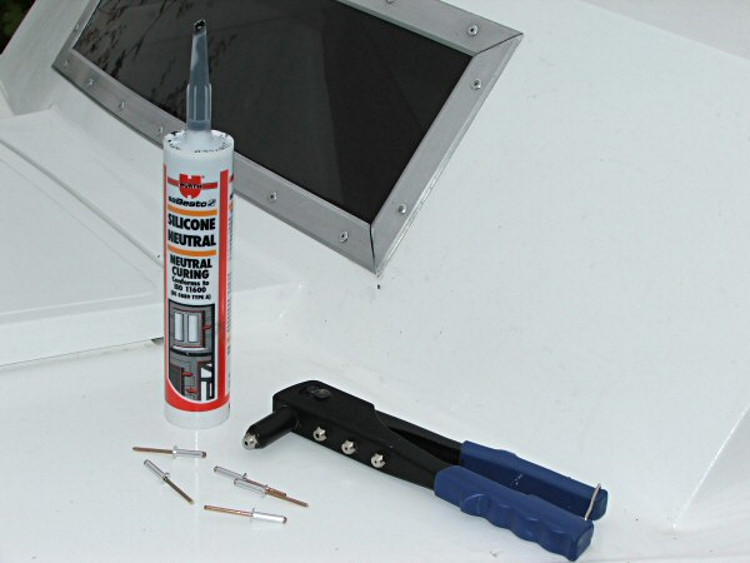
Pop rivets are sized in three dimensions, diameter of the pin, diameter of the rivet shank and length from shoulder to pinhead. Studying other SeaHawks it is clear that different sized rivets have been used as different times, so there is no point on recording the diameters here. however, length of the rivet body is key as, if this is too short it will not bow properly and form the required sealing bulge on the inside of the cabin. On this boat 20mm was the appropriate length and there is no reason for not supposing that this should be correct for other boats as well.
The only problem with this installation turned out to be snapping off the pins of the rivet. This should be taken care of by the rivet gun. But, in this case, with fairly thick 3mm pins, the pin frequently sheared off 10mm out from the river shoulder, and it then had to be cut or filed manually.
Surprisingly, the exposed pin ends show no sign of corrosion, even after many months, although the filings from these same pins spilled onto the deck turned to rust overnight and the "powder stain" took a surprising amount of work to remove from the fresh paint
If you know what the correct technique is for ensuring rivet pins shear where they should, please use the Forum!